Honda CB750 Sandcast

Bringing 1983 / 2005 back to live

Sgt.Pinback · 353 · 104542

Sgt.Pinback

  • Hero Member
  • *****
    • Posts: 695
    • View Profile
My wife mounted the fuel cap and the latch. My fingers are too thick  ::)

Brave girl.

Found a recessd ignition switch in my boxes ..
« Last Edit: April 09, 2017, 12:50:42 pm by Sgt.Pinback »
Cheers, Uli (Leonberg, Germany)


Sgt.Pinback

  • Hero Member
  • *****
    • Posts: 695
    • View Profile
.. and a set of mirrors. Have the patent number, MS and HM logo.

Cheers, Uli (Leonberg, Germany)


Sgt.Pinback

  • Hero Member
  • *****
    • Posts: 695
    • View Profile
Happy eastern... finally got a double cut fender without speedo cable holder hole.

Genuine part, new chrome
Cheers, Uli (Leonberg, Germany)


Sgt.Pinback

  • Hero Member
  • *****
    • Posts: 695
    • View Profile
Got alternator cover. Been polished too much.

What would you recommend to have it less shiny?
Do you clearcoat the cover?
Cheers, Uli (Leonberg, Germany)


kp

  • Administrator
  • Hero Member
  • *****
    • Posts: 1806
    • View Profile
That side cover will not do at all. I have a really nice one I can swap you for   ;D
Yabba Dabba KP


Steve Swan

  • Hero Member
  • *****
    • Posts: 2705
    • View Profile
    • cb750sandcastonly.com
Got alternator cover. Been polished too much.

What would you recommend to have it less shiny?
Do you clearcoat the cover?

always difficult to tell in pics the degree of lustre.  i'll stick my neck out and say it doesn't 'appear' overly-polished to me....  there is some good posts on buffing/polishing techniques some of the fellows use.  Mark's #97 resto thread comes to mind.  and there's some threads on clear coating procedures.  if you do a key word search, they'll be there.


Sgt.Pinback

  • Hero Member
  • *****
    • Posts: 695
    • View Profile
Like a mirror
Cheers, Uli (Leonberg, Germany)


Sgt.Pinback

  • Hero Member
  • *****
    • Posts: 695
    • View Profile
That side cover will not do at all. I have a really nice one I can swap you for   ;D

Yes. Realy odd that cover.
Siightly lighter than all my others.
Cheers, Uli (Leonberg, Germany)


Sgt.Pinback

  • Hero Member
  • *****
    • Posts: 695
    • View Profile
yes, that's shiny.  if you can find Mark's post in his thread, it'll tell you what he did to make his look like factory.

Found it on page 32

May I quote Mark:

"I’m not going to be able to get much further until my polishing is done so I’m finally ready to get everything clear coated.  I had someone help me out with a lot of it.  I still had to dial it back a bit with the gray Scotchbrite.  I’m going to have it clear coated in two batches (engine covers and frame parts). .. "

Gray scotchbrite + clear coat.  Wont get "gray scotchbrite" here in G but maybe something similar. I assume that is ultra fine 800 or even higher 1500?

Is this aplied wet?
« Last Edit: April 19, 2017, 10:27:03 am by Sgt.Pinback »
Cheers, Uli (Leonberg, Germany)


Steve Swan

  • Hero Member
  • *****
    • Posts: 2705
    • View Profile
    • cb750sandcastonly.com
Theres another thread somewhere by someone else.   Ujenji ?  There's also discussion about clearcoat application.   I'd suggest contacting these fellows directly, off the forum, pm them or email. 

I cant be of help.  I made the covers on 232 look like mirrors and painted nothing on the engine.  I wanted bling-bling.

On other 750's, i polished to a lustre i felt loiked like original.  I used a clearcoat with hardener.


Sgt.Pinback

  • Hero Member
  • *****
    • Posts: 695
    • View Profile
Some indicator glasses I found on the bike

upper lft: stanley 045-6575 Japan
upper right: stanley 6-0345 SAE D 67 Japan (new)
lower left: VICTOR DH-I,  SAE D4, USA
lower middle: CGC 41915, Japan
lower right: stanley 6 0345 SAE D 67 , E4....., Japan

Correct is upper right? Found a set of them NOS.
Cheers, Uli (Leonberg, Germany)


Steve Swan

  • Hero Member
  • *****
    • Posts: 2705
    • View Profile
    • cb750sandcastonly.com
Some indicator glasses I found on the bike

upper lft: stanley 045-6575 Japan
upper right: stanley 6-0345 SAE D 67 Japan (new)
lower left: VICTOR DH-I,  SAE D4, USA
lower middle: CGC 41915, Japan
lower right: stanley 6 0345 SAE D 67 , E4....., Japan

Correct is upper right? Found a set of them NOS.

yes, upper right is correct.


Sam

  • Administrator
  • Sr. Member
  • *****
    • Posts: 397
    • View Profile
My experience getting the right level of polish and clearcoat. Mark clued me into some of this!

The short of it is that Honda did not polish these engine covers to chrome-like shine. Over polishing them is, therefore, to be avoided!

My technique:

1. Remove the old clearcoat with a paint remover. I use Aircraft paint remover. Just be sure to not let it sit on the aluminum too long; it can stain aluminum if left for an hour or more.
2. Wetsand out scratches with 400.
3. Once scratches are out, sand the entire part in the correct direction. Keep it in one direction. Cross-sanding will show up in the light!
4. Progress down to 1000 grit paper. All wetsanding of course.
5. Polish the part. No need to get it to a perfect mirror shine. Again, polish in the same direction that you sanded.
6. Here's the strange part that Mark clued me in to: go back and scratch the polished surface with grey scrotchbrite. This is seems crazy, but it will look great. Make sure you have gone over it a few times so the scotchbrite scratches are even.
7. Go over it again with white scotchbrite to smooth everything out just a bit. You should now have a part that shows the "grain" of your sanding, polishing and scotchbriting in the same light.
8. Clean the part with wax and grease remover. Super important to get the surface as clean as possible before paint!
9. Paint the black behind the honda logo if you are working on the alternator cover. Make sure you use high-heat engine paint. I use duplicolor engine paint and have been pleased.
10. Not its time to paint the clear coat. This is your final chance to get wax, grease, fingerprints and more off the metal! Paint in the shade so it has time to even out before drying and give it three medium coats with 5 to 10 minutes pauses between coats. The old paint guys always tell me to make the last coat look like one big drip! Avoid real drips, but the point is to not go too light or you will get a satin-look to the clear coat instead of a reflective finish.

That should do it!

The result:
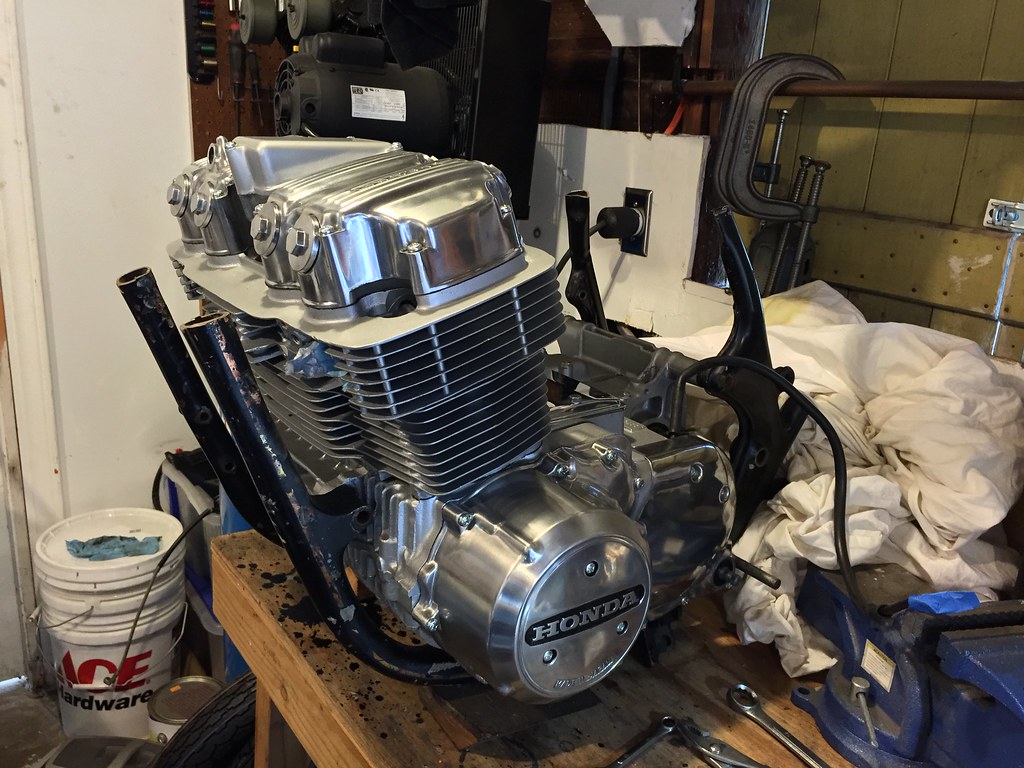
Ready to put in the frame. by samuelmroberts, on Flickr
Ujeni Motors
Sandcast #410
Sandcast #538 Watch the restoration!
Sandcast #6592 All original daily driver.
Diecast #16608


Sgt.Pinback

  • Hero Member
  • *****
    • Posts: 695
    • View Profile
Thank you both.

« Last Edit: May 02, 2017, 07:14:04 am by Sgt.Pinback »
Cheers, Uli (Leonberg, Germany)