Honda CB750 Sandcast

Restoration of Sandcast #97

markb · 814 · 324947

markb

  • Moderator
  • Hero Member
  • *****
    • Posts: 1249
    • View Profile
I checked with my painter and what he used was PPG Concept #9300 Polyurethane paint.  Hope that helps.
Mark
Mark B
1969 CB750 sandcast #97 restored - Sold Restoration thread link
1969 CB750 sandcaxt #576 - Sold
1969 CB750 sandcast #1553 - Sold
1969 CB750 sandcast #1990 - Sold
1969 CB750 sandcast #5383 restored - Sold Restoration thread link
1970 CB750 K0 restored - Sold
2010 H-D Tri Glide Ultra Classic (Huh?)


ack3r

  • Full Member
  • ***
    • Posts: 109
    • View Profile
I checked with my painter and what he used was PPG Concept #9300 Polyurethane paint.  Hope that helps.
Mark

 :P Now for me is ok.
The poliurethane paint have better features.
Many many thanks for the assistance.
coming soon i insert the new pictures.
Bye
Cb 750 Four k0 1970  "restoring ended"
Xr600r 1986 ''work in progress''
Cb 750 Fa 1980
Vespa Vba1t 150 year 1959


markb

  • Moderator
  • Hero Member
  • *****
    • Posts: 1249
    • View Profile
OK, so after my summer hiatus, I’m officially back to it.

I’ve spent the last week or more getting things organized and trying to figure out what to do for the alternator cover.  As earlier posts show, it has a crack and some gouges in it.  One way or the other, it has to have some welding done to it.  I decided to experiment with an old valve cover that came off an 11/69 build engine (probably about as close to being the same material as could be).  I had a welder make some welding rods out of the cover and use it to patch a hole that he had drilled into the cover.  It actually turned out pretty good as far as blending in but even with the small diameter rods (1/16” or 1.5 mm) I’m still concerned about getting weld into the lettered area on the cover plus I would have to do a test area on the alternator cover to be sure it would color match.

After a dozen or so phone calls and visiting several shops I came up with some other options.  Two places suggested I just weld the whole lower half over and redo the lettering.  After taking a picture and digitizing it, one guy would make an electrode with the lettering on it and EDM it and the other guy would engrave it.  Both said it would be identical.  OK, so in case I really botch it up I have a backup plan to fix it.

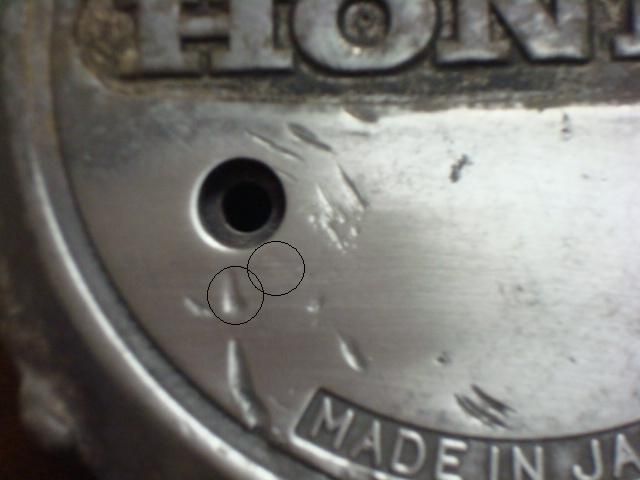
So I also found a guy that does micro welding and mold repair.  For those not familiar with it, you actually look at the work through a microscope and a laser does the welding with a very small diameter wire.  The welder didn’t think the color would match but he did a small test weld and I think it’s pretty close.  I tried taking a pic that shows it but this crappy one is the best I could get.  The left black circle shows a typical gouge and the right circle shows the area where there was a gouge a little smaller than the one that’s circled.  If I hold it just right I can see it from about 6” (15 cm) away but on the bike from a foot (30 cm) away I don’t think you’re going to see it.  You can kind of make it out.  I go for the original brushed look instead of polished and I think that will make it harder to see too.

I think this is the method I’m going to use.  A real plus is there is virtually no heat.  I touched it immediately after he was done welding and it was cold.  I would have left it with him but I’ve got some screws that I want to remove first in case he has to do more repair.  I don’t think I mentioned this in the spring but I had to drill screw heads off to remove the coil.  I didn’t want to, but believe me, I tried everything.  I tried tapping it and using a left-handed screw (better than an Ezy Out I thought, I don't like them) to get them out but they still wouldn't budge.
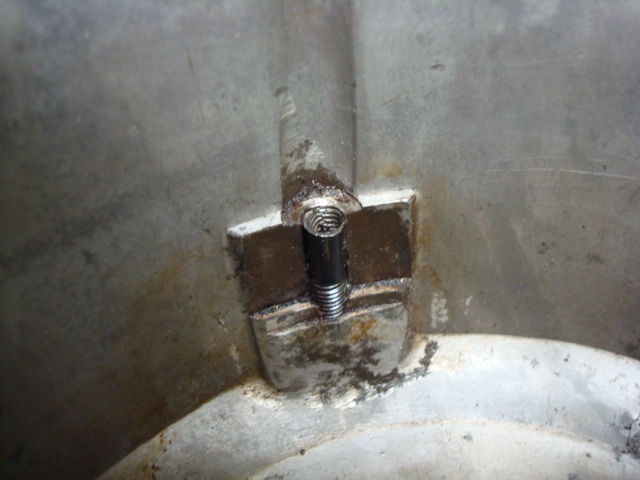

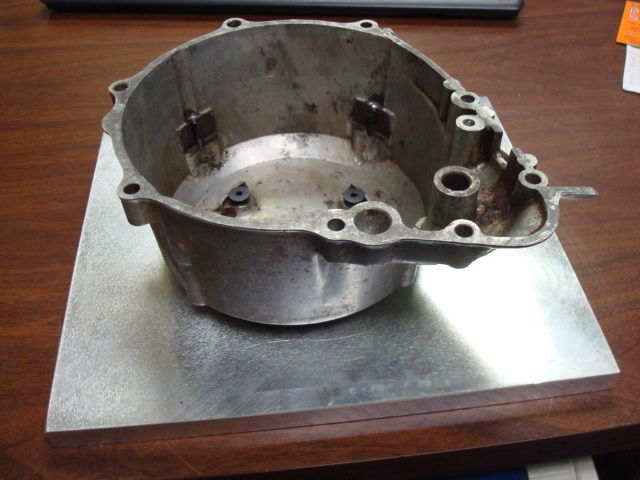
So I mounted the cover on a plate to make it easier to remove the screws.  I’m dropping it off today.  The guy is going to first trying putting a hex hole in the end of the screw with EDM and removing them with an allen wrench.  If that doesn’t work he’ll EDM the screws out.  I should get it back by the end of the week.

After that I’m going to clean it up and try to sand out some of the gouges that aren’t too deep and then drop it off for micro welding.
« Last Edit: October 24, 2011, 03:25:34 pm by markb »
Mark B
1969 CB750 sandcast #97 restored - Sold Restoration thread link
1969 CB750 sandcaxt #576 - Sold
1969 CB750 sandcast #1553 - Sold
1969 CB750 sandcast #1990 - Sold
1969 CB750 sandcast #5383 restored - Sold Restoration thread link
1970 CB750 K0 restored - Sold
2010 H-D Tri Glide Ultra Classic (Huh?)


Steve Swan

  • Hero Member
  • *****
    • Posts: 2705
    • View Profile
    • cb750sandcastonly.com
Mark, is EDM expensive ?  Could you give a general idea of cost ?  Certainly seems the preferred method for removing stubborn twisted off screws.


markb

  • Moderator
  • Hero Member
  • *****
    • Posts: 1249
    • View Profile
The guys that do it seem to all charge for the time rather than per hole.  I've paid anywhere from $20-$50 a hole depending on how much trouble they have.  The biggest problem is after they burn the screw out to the tap drill diameter, the screw threads are still in the hole.  They have to be removed sometimes by picking them out with a small pick by hand.  But sometimes EDM is the only option.
Mark B
1969 CB750 sandcast #97 restored - Sold Restoration thread link
1969 CB750 sandcaxt #576 - Sold
1969 CB750 sandcast #1553 - Sold
1969 CB750 sandcast #1990 - Sold
1969 CB750 sandcast #5383 restored - Sold Restoration thread link
1970 CB750 K0 restored - Sold
2010 H-D Tri Glide Ultra Classic (Huh?)


markb

  • Moderator
  • Hero Member
  • *****
    • Posts: 1249
    • View Profile
I picked up the alternator cover, minus the screws.  It wasn’t as bad as I thought.  They ended up burning a hex hole in the end of the screw and turning them out with an allen wrench.  They still had to use heat but much less invasive than burning the screw out.  I guess I had the right idea with the LH screw but I had torqued it to the point where I though the screw was about to break.  This was better.


Mark B
1969 CB750 sandcast #97 restored - Sold Restoration thread link
1969 CB750 sandcaxt #576 - Sold
1969 CB750 sandcast #1553 - Sold
1969 CB750 sandcast #1990 - Sold
1969 CB750 sandcast #5383 restored - Sold Restoration thread link
1970 CB750 K0 restored - Sold
2010 H-D Tri Glide Ultra Classic (Huh?)


markb

  • Moderator
  • Hero Member
  • *****
    • Posts: 1249
    • View Profile
I should be working on my alternator cover but I decided to plastigage my mains instead.  After remeasuring the crank journals I decided to go with yellow-green-yellow-green-yellow for the bearings.  They ended up all being very close to same.  As you can see in the pic, the one that appeared to have the largest clearance was somewhere between .0015 and .002”, maybe .0017 to .0018”.  Since the standard clearance is supposed to be between .0008-.0018”, I’m on the high side but well within the factory maximum of .0032”.  All the others were maybe .0001-.0002” less.  I suppose I could go green-brown-green-brown-green and tighten them up a little but I think I’m OK with it.  This engine probably won’t get more than a few hundred more miles on it so maybe looser is better.  Although I thought I read somewhere that plastigaging indicates a bit tighter than it really is.  I think I’m still OK with it unless someone has a strong opinion otherwise.


Mark B
1969 CB750 sandcast #97 restored - Sold Restoration thread link
1969 CB750 sandcaxt #576 - Sold
1969 CB750 sandcast #1553 - Sold
1969 CB750 sandcast #1990 - Sold
1969 CB750 sandcast #5383 restored - Sold Restoration thread link
1970 CB750 K0 restored - Sold
2010 H-D Tri Glide Ultra Classic (Huh?)


markb

  • Moderator
  • Hero Member
  • *****
    • Posts: 1249
    • View Profile
I see no comments about my bearing clearance so I guess that’s a good thing.  :)

So I thought I’d made up my mind about doing the micro welding but in second guessing myself I decided to do a little more research.  There are two choices for rods, 4043 and 5356.  I had my welder use those materials on my test cover so I could compare.  Here’s after welding.


Here’s after sanding and polishing.  Not a great job but enough to see results.  It took about 20 shots to get one that showed a difference and you still have to hold it just right to see it but there is a difference.  The 4043 and 5356 look very similar in the picture but the 5356 is definitely shinier.  Between those two the 4043 would be the best choice.  That’s what the micro welder used to test on the alternator cover.  But the area that was welded with rods made from the cover (somewhere in the circle) is barely detectable.  I’m not even sure that I can see it with the naked eye.  


So I am going to have my welder do it with the similar material home-made rods.  He said he would see how it goes and could do most of it but he may want to stay away from the lettering.  I figure at most there are two spots in the narrow band just below the “MADE IN JAPAN” that I could finish with the micro welding where it won’t show.  Here are the rods I made up.  It was hard to make them much smaller than 1mm square because they are very brittle.


I realize I’ve been pretty anal about this cover.  I’ve even been annoying myself but this smooth logo, thin-lipped cover was only used on the first 342 engines.  So I want to get it as good as I can.  The bad part is my welder just took on a big job and won’t be able to get to it for a couple of weeks.  I’ll have to find something else to work on.  Only about a million things to pick from.
Mark B
1969 CB750 sandcast #97 restored - Sold Restoration thread link
1969 CB750 sandcaxt #576 - Sold
1969 CB750 sandcast #1553 - Sold
1969 CB750 sandcast #1990 - Sold
1969 CB750 sandcast #5383 restored - Sold Restoration thread link
1970 CB750 K0 restored - Sold
2010 H-D Tri Glide Ultra Classic (Huh?)


markb

  • Moderator
  • Hero Member
  • *****
    • Posts: 1249
    • View Profile
It’s been a while since I posted again but I having been working on it.  I’m still waiting for my welder to do the alternator cover.  In the meantime I have been busy trying to gather and sort all of my parts into their finish category: paint, zinc, chrome, anodize, etc., so I can send them out.  Some of the smaller chrome parts I may try to buy if available because it’s cheaper than trying to rechrome them.  What’s slowing things up is I’m trying to get everything together for #97 and well as most of the parts for #1553 plus a spare engine so basically parts for 2 ½ bikes.  That and I want to drop off the head for some valve guide work and cylinders for honing.
So that brings me up to my current problem.  The cylinder separated cleanly from the case, In other words virtually no gasket stuck to the case, but the gasket on the bottom of the cylinders is kicking my a$$.  It is hard as rock and stuck to the cylinder like it was super glued.  This picture shows my progress after three hours of work, maybe 10% removed.  I’ve tried various solvents, Permatex gasket remover, razor blades and gasket scrapers.  Nothing seems to soften it or get it loose.  I talked to the guy whose going to hone the cylinders and he said he would just sandblast it off.  I’m concerned that may damage the surface.  This is the worst I have ever seen.  Any suggestions?  At the rate I am going it will only be another 27 hours.

Mark B
1969 CB750 sandcast #97 restored - Sold Restoration thread link
1969 CB750 sandcaxt #576 - Sold
1969 CB750 sandcast #1553 - Sold
1969 CB750 sandcast #1990 - Sold
1969 CB750 sandcast #5383 restored - Sold Restoration thread link
1970 CB750 K0 restored - Sold
2010 H-D Tri Glide Ultra Classic (Huh?)


jkp2240

  • Newbie
  • *
    • Posts: 37
    • View Profile

kmb69

  • Sr. Member
  • ****
    • Posts: 307
    • View Profile
I would strongly advise against sand blasting it. This can be one of the toughest jobs I run into as well. Never found a good solvent that will soften these gaskets. Take your time. Try not to score the aluminum surface.


Wayne

  • Administrator
  • Hero Member
  • *****
    • Posts: 1044
    • View Profile
Mark
When I was on the bench this was my weapon of choice for tough gasket cleaning, even on aluminum heads and intakes. I would just go carefully until almost through and then use gasket remover and a scraper to do the remainder. I just checked my cylinders. Looks like I'm in for a bit of what you are up against!
[size=


markb

  • Moderator
  • Hero Member
  • *****
    • Posts: 1249
    • View Profile
I'm definately not going to sand blast it.  And Wayne, that looks a little scary to me too.  I think I'll try some heat.  How about hot tank or ultrasonic?  Or even just burn it off with the propane torch?
« Last Edit: December 15, 2011, 02:51:42 pm by markb »
Mark B
1969 CB750 sandcast #97 restored - Sold Restoration thread link
1969 CB750 sandcaxt #576 - Sold
1969 CB750 sandcast #1553 - Sold
1969 CB750 sandcast #1990 - Sold
1969 CB750 sandcast #5383 restored - Sold Restoration thread link
1970 CB750 K0 restored - Sold
2010 H-D Tri Glide Ultra Classic (Huh?)


Wayne

  • Administrator
  • Hero Member
  • *****
    • Posts: 1044
    • View Profile
It's not as bad as it looks Mark. The scotch pads and the variable speed angle grinder actually do a nice job. I'll give mine a shot here an a while when I get a chance.
[size=


kp

  • Administrator
  • Hero Member
  • *****
    • Posts: 1806
    • View Profile
I'm not expert in this area but a gas torch would be worth a shot as you've suggested. Should soften up the bond I would think. I have an ultrasonic and if I remember it don't remove gasket so well KP
Yabba Dabba KP