Honda CB750 Sandcast

Show Posts

This section allows you to view all posts made by this member. Note that you can only see posts made in areas you currently have access to.


Topics - markb

Pages: 1 2 3 ... 6
1
General Discussion / Sandcast assembly line
« on: April 05, 2020, 05:19:18 pm »
Not exactly like the production line in Japan but I’m assembling three sandcast engines at the same time. With everything that’s going on with COVID-19 I have more free time than usual so what better than to do bike work. Overall it will take less time than doing them one at a time and it’s kind of fun especially when you get this far.

2
Brakes / Codes on front brake disks
« on: March 17, 2019, 04:58:42 pm »
I’ve been working on restoring brake disks and have found some codes stamped on them. They don’t appear to be date codes to me. Anyone have a clue what they mean? Right now I have a NOS K1 disk holding a place on #97 until I get a disk refurbished. I should have kept track, and maybe it doesn’t matter, but any opinions which one may have come off #97?

Some of the numbers are hard to read and don’t turn out well in the photo but here’s what I think they are.

W27S


A-17


A206-25 or A200-25


YS-9S


N-V346 or N-1346


1029-3B or I029-3B


3
Lighting Systems and Chassis Electrical / 19mm Hex Front Turn Signal Stems
« on: February 05, 2019, 06:50:19 pm »
I just discovered (or maybe rediscovered) that #97 has a 19mm hex on the front turn signal stems (later are 17mm). Steven asked me about them and it jogged my memory. I had kinda remembered that there was something different about the stems on 97. The problem is that I was missing one of them so back then I decided to use the 17mm version.

I'm looking at the one I have and I could probably make one from scratch with too much difficulty. The biggest problem would be matching the knurling. It also would not be too much trouble to make them out of newer stems. Just an easy lathe job of turning off the nut and then copper brazing a bigger nut on. A minor problem is the nut is a little thicker but could be machined off. After chrome plating you would not be able to tell the difference.

I couldn't find a reference to this on the site. So do we have any idea how rare this distinction is? What VIN was it used up to? So is this a sought after part?

4
Brakes / Any good tricks for restoring the front brake disk on a CB750?
« on: January 07, 2019, 08:37:19 am »
I have a disk in nice shape but would like to improve the looks of the disk itself. I can chuck it on the lathe on the ID and I'm thinking maybe Scotchbrite or fine sandpaper. Any opinions before I try it?

5
Here's the listing.
https://www.mecum.com/lots/LV0119-348551/1969-honda-cb750-sandcast/
Anyone know anything about this one? It lists the VIN and engine number being the same.  ??? Too bad there isn't more pics and closeups of the numbers.

6
I had a discussion with an old mechanic recently and have since read several posts that all said the early CB750 engines did not have seals on the exhaust valve guides.

I’ve done some research and found that the 69.4 (sandcast) parts manual calls out 8 valve guide seals and the drawings show the groove on the exhaust valve guide for the seal (part #12027-300-300).

Also the CB750 ~ K2 parts manual calls out 8 valve guide seals up to number 14955, then 4 seals from 14956-2000000 (up to K1) and then 8 again for K2. It shows exhaust valve guide #12027-300-310 up to K1’s and #12027-300-330 for K2’s. The drawing also shows the grooved exhaust guide (but that probably doesn’t mean much).

Of the six engines I have worked on in the last few years, numbers 100, 748, 1490, 1789, 5491 and 12029, all of them had the grooved (seal) type exhaust valve guides. It is possible but I think highly unlikely that all five of the sandcast engines had the exhaust guides changed out from seal less to seal type guides. The early diecast I can say with 100% certainty that it was born with the seal-type guides. I bought it from the original owner who I knew in1975 (and still have) and the engine had never been touched.

My conclusion from all this is that the engines had exhaust valve guide seals in sandcast and early diecast engines up to 14955. Then engines up to K1’s did not have seals. Then K2’s and after had seals again.

The only reason this matters to me is I’m working on the heads for a couple of these engines and there is a good chance I might have to replace some valve guides and as usual (for me) I’m going for correct. To add to the confusion I have found pictures on eBay (and others) for all three part numbers listed above and the -310 number is the only one that had no seal (which coincides with above) but the other two numbers had pictures with and without seal grooves. I know that sometimes the picture shown is not correct and in fact I did buy some “-310” guides from two different sources and got two different parts.

So my questions are:

Is my conclusion correct?

Has anyone seen a sandcast engine with seal-less exhaust valve guides?

What is the correct part number for the seal-type exhaust valve guide?

What is the difference between the inlet and exhaust valve guides that have the seal grooves (length, diameter)?

7
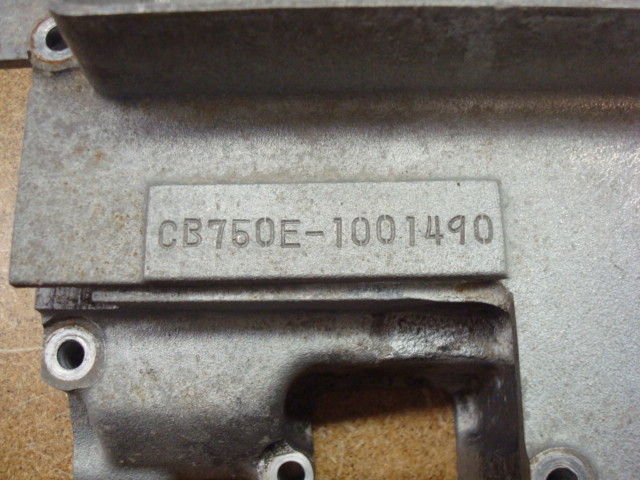
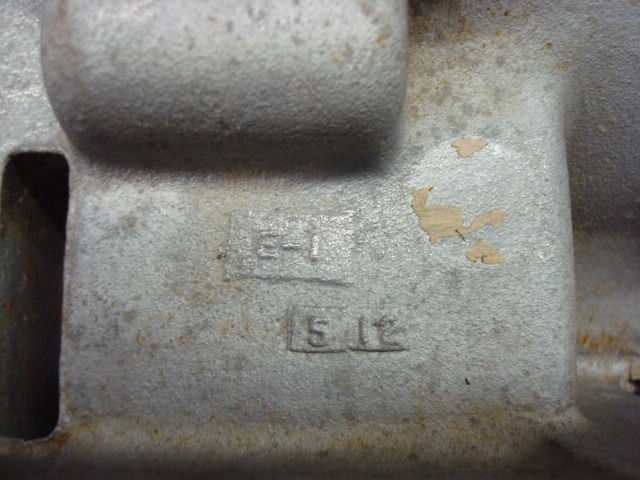
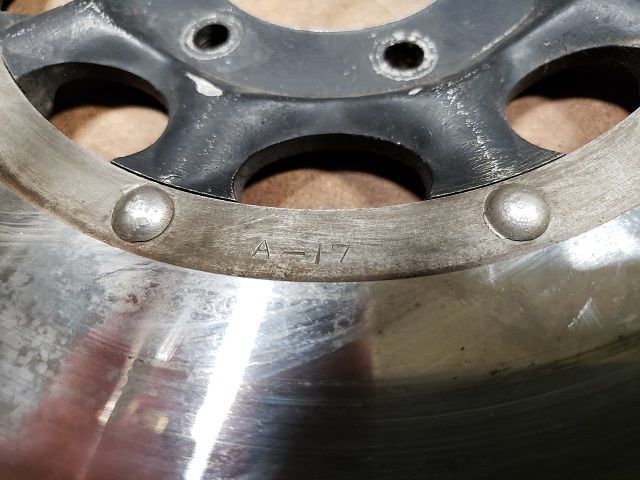
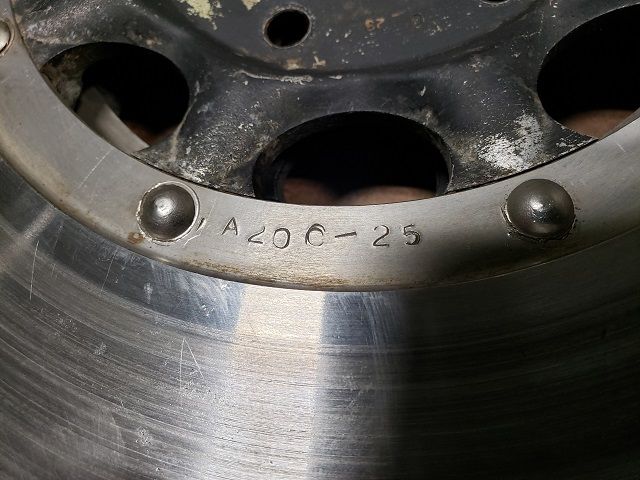
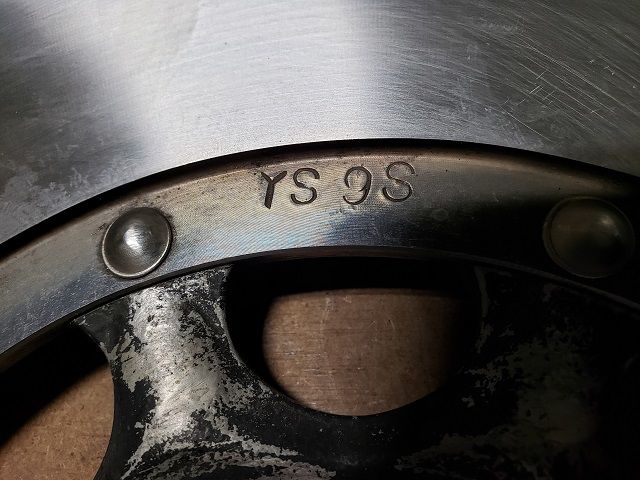
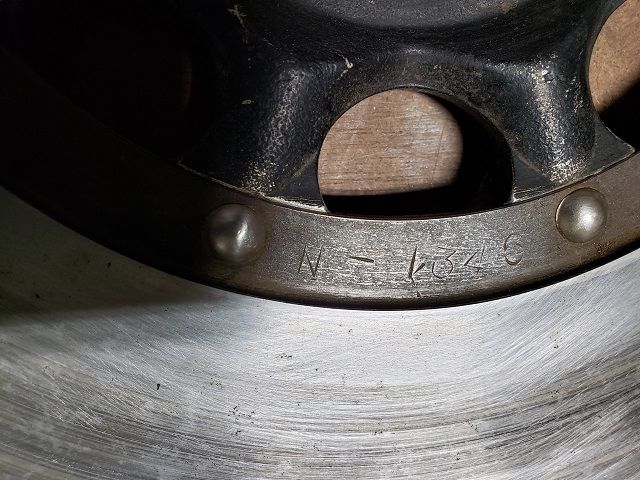
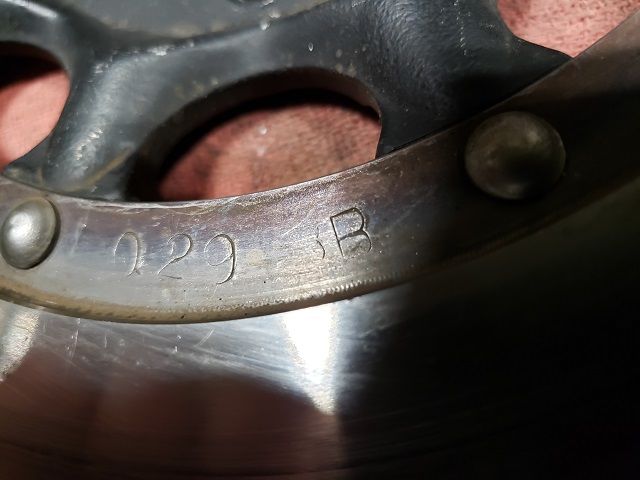
I acquired sandcast engine E1490 several years ago with the intension of repairing damaged cases and getting another sandcast engine back together. Unfortunately, there are six areas that need to be addressed. If it wasn’t for the fact that they’re fairly early, legitimate cases I wouldn’t waste my time. Here’s the number.


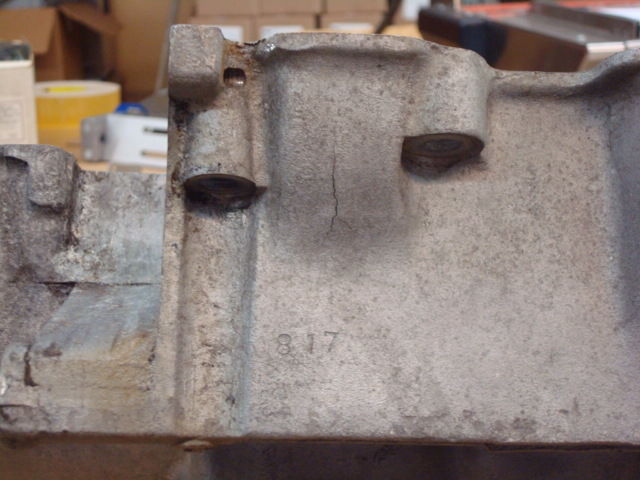
And the casting dates.


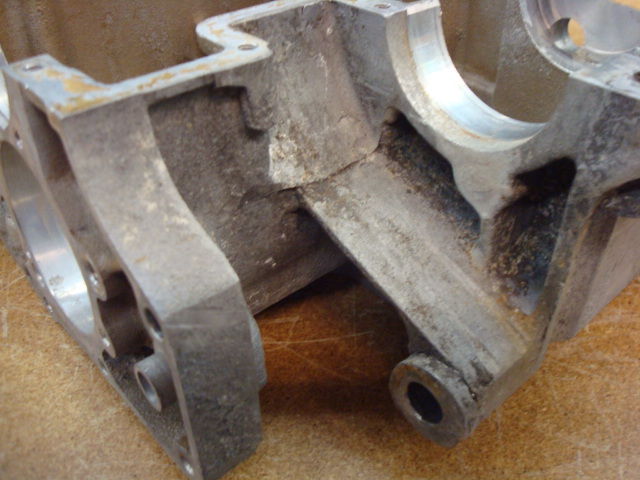
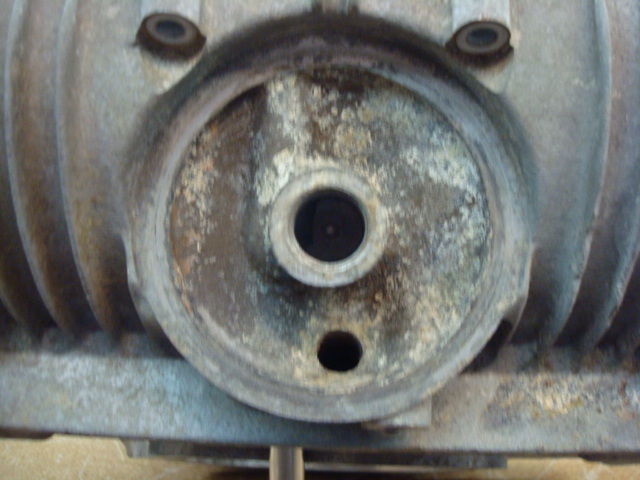
What happened was the outside bearing on the final driven shaft failed (probably under load) causing the final driven gear to crash into the rear of the crankcase. I understand this wasn’t as common as the chain break problem but it must have happened often enough for Honda to change this bearing on the K2’s.

This caused the crankcase to crack and the bore for the inside final drive shaft bearing to get damaged. Here you can see where the gear hit the inside of the case and the damaged bearing bore.


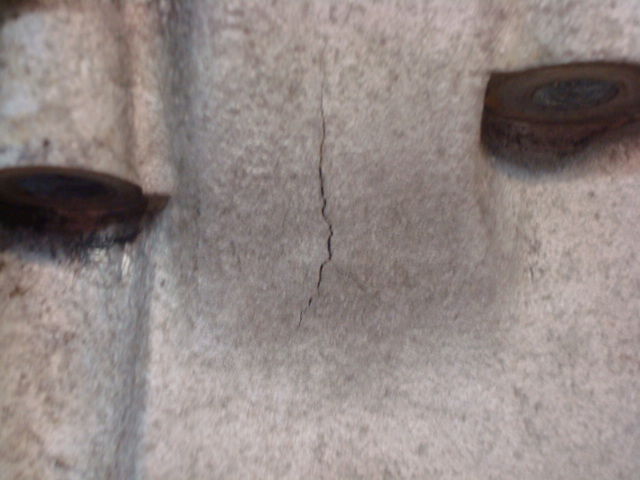
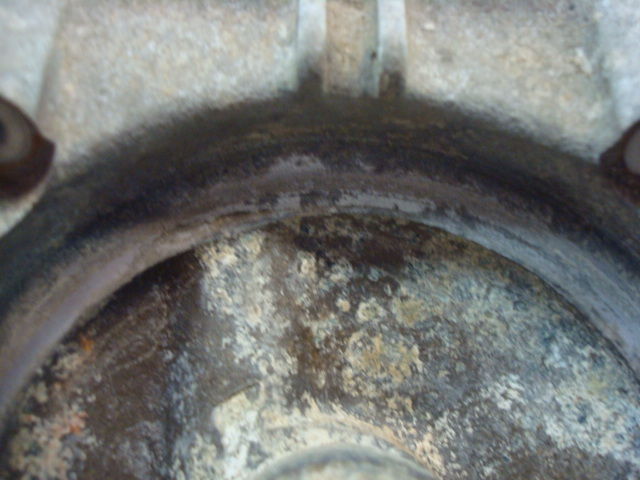
Here is the crack on the outside.


A closer look.


Fortunately it does not have any chain break damage.


Apparently then, after it was damaged, it must have sat around for a while. Long enough for the oil filter housing mating surface to get corroded. I’ve seen that before on E100.


And a close up.


Then someone finally decided to try to repair it. They should have had someone who knew what they were doing. The stud on the front of the engine between cylinder #3 and the cam chain tunnel is broken off.


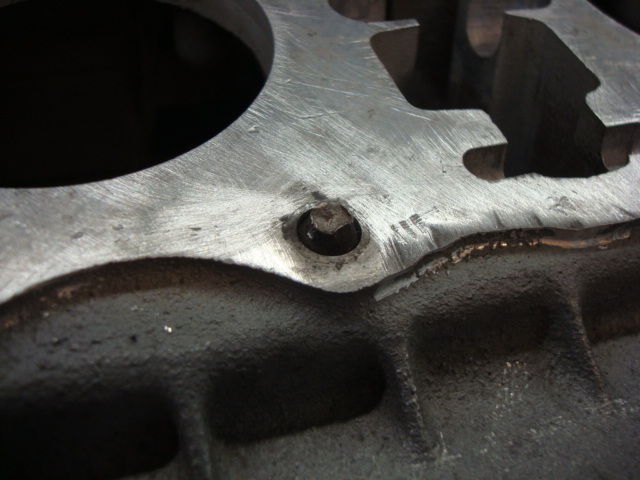
Also the stud hole is broke out on the front of the engine on the corner by the #4 cylinder.
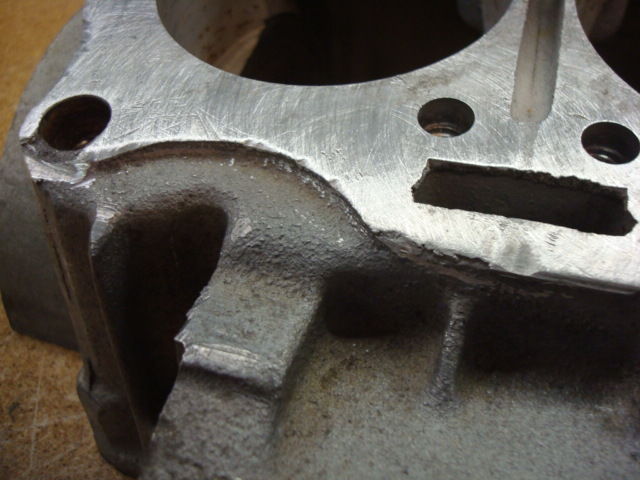
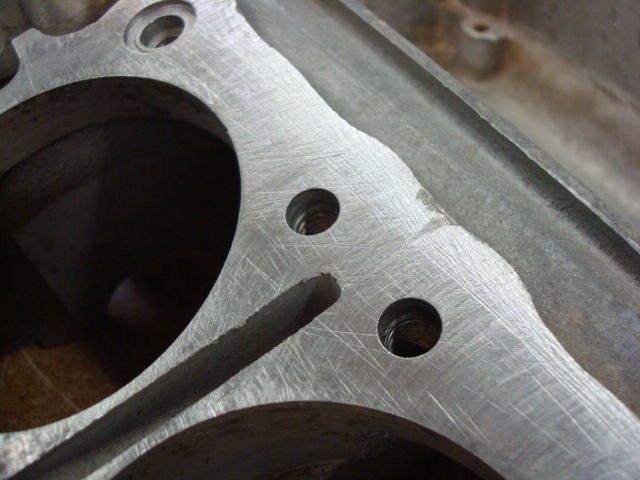

Finally it appears that the “mechanic” used a sandpaper disk grinder to remove the cylinder base gasket.


So I have some ideas but I have some questions too.

Should the crack be welded on the inside, outside or both? It would be nice to try to match the surface enough so the repair isn’t very noticeable.

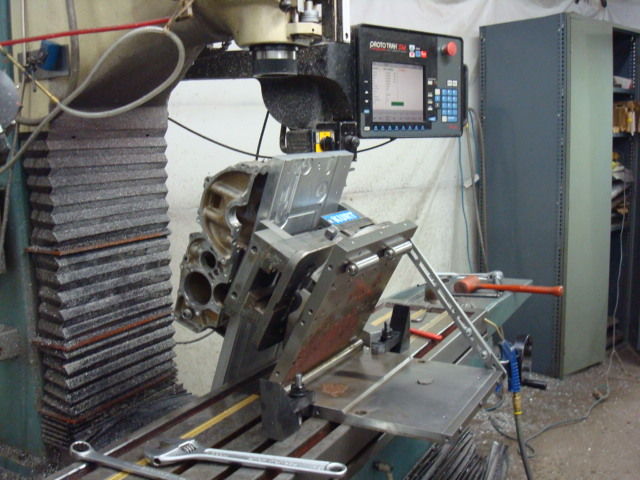
I think the bearing hole can be cleaned out with a boring tool on the mill.

I need to clean up the oil filter housing surface to see how bad the pitting is but I can put that on the mill like I did for E100.

It would just be nice to find an easier way.

The broken stud can be removed by EDM or drilling. The other hole I think will take some welding then re-drilling and tapping and counter boring. Does anyone have the dimensions for the location of the studs? I think someone here made billet cylinders; they would have to have the dimensions.

The sanding damage has me concerned. I need to check how flat it is. It’s much worse than the picture shows. How much material could I skin off the surface without causing a problem? How about smearing some JB Weld on it to fill in the gouges then machining it flat?

Like I said, I think it’s worth the effort and if any of you have any good ideas for some of these repairs I would certainly appreciate hearing them.

8
General Discussion / Sandcast at Mecum Las Vegas 2017 auction
« on: February 06, 2017, 09:51:42 am »
Did anyone see the recent Mecum auction in Las Vegas? I didn't but I was told there was sandcast sold so I pulled up the auction results and it looks like one went for $28,000. There isn't much significant info about it other than it was from the Rose City Motorcycle Museum and that it was a low number VIN. Does anyone know anything about this bike and what the VIN is?
Mark

9
As the subject line says I am trying to find the thread diameter and pitch for spoke threads. I measure 3.5mm diameter but I'm struggling with the pitch. I'd like to run a tap through the nipples before I get them plated.
Mark

10
I got this from Yamiya recently.  It is larger and way different than the ones I’ve gotten before from them.  Is it correct?


11
Anyone have a good method for restoring the color to the RH control knob.  I need to save this rare pointerless knob.  It seems like there should be some kind of polish.  I was even thinking of using a semi-gloss black paint.


12
Red or orange?  The repros look red to me.  The old ones look orange.  Just faded?

13
Brakes / I need help identifying early rear brake arm
« on: August 24, 2015, 09:24:57 am »
Somehow I missed the rear brake arm when I did my chrome plating.  Now I’m not sure which brake arm is the original.  Can anyone tell me what the characteristics of the early brake arm are?

Here are the 4 that I have.  They’re in the same location left to right in all pictures.  The left most one has a slight curve in it and also notice the differences in the left side of the clamp area.


Here the curve is more apparent in the left one.  The other three are straight.  The left two have raised numbers on them.


Quite a bit of variation in this view on the clamp ends.


Some subtle differences here in the size of the radius where the round end blends back to the straight arm.


14
Brakes / Master cylinder assembly question
« on: August 18, 2015, 08:59:52 am »
The parts diagram isn’t completely clear to me on the master cylinder parts.  Can someone confirm to me that the center part in the photo (Primary Cup) is oriented correctly?

Here’s a close up.  I think the cup goes over the end of the spring, not over the end of the piston.


Thanks,
Mark

15
My carb bowls came out shinier than I think they should be.  Does anyone know of a way (like a chemical dip or wipe) that would turn polished aluminum to a dull grey finish?

Pages: 1 2 3 ... 6