Honda CB750 Sandcast

Restoration of Sandcast #1629

Sam · 42 · 32123

Sam

  • Administrator
  • Sr. Member
  • *****
    • Posts: 397
    • View Profile
Hi everyone. Here’s the story of restoring sandcast #1629. I’m going for a high-quality job here; I plan to have an excellent running bike that looks brand new.

I’ve restored several CB750s over the last eight years or so. Here’s a picture of my last CB750 restoration; a K4 (painted like a k1):


I had just bought a diecast K0 to restore when I came across this bike on craigslist:


It was non-running with loads of incorrect parts. In sad shape for sure, but it was a sandcast engine with an incorrect frame (a late K0 with a lot of chopper mods). I was the first caller and the first to show up. I walked away with quite the basket case: sandcast fever had me!

Next...getting it home and tearing it apart!
Ujeni Motors
Sandcast #410
Sandcast #538 Watch the restoration!
Sandcast #6592 All original daily driver.
Diecast #16608


Sam

  • Administrator
  • Sr. Member
  • *****
    • Posts: 397
    • View Profile
My first job was to tear the engine apart to figure out its condition. The seller had no idea what I would find since it wasn’t running.


I interpreted this as #1629, but had doubts (perhaps #1621?). The consensus thinks that it is a 9 though.

A few pics as I took the engine apart:


Ugly! Ugly and dirty! Gotta start somewhere right?  ;D

A few findings...

The good news was that the engine turned over and shift through the gears. The first bad news was that the head was from a K1 or later. The second bad news was all the brown liquid I found in the engine. At first, I was sure it was rusty water, but I quickly figured out that there was a liter or two of fuel inside the engine! Someone must have tried to add fuel through the oil tank at some point! Sheesh.

Fortunately, there was no rust on the inside and no broken parts. The next bit of bad news was that a few of the parts had been chromed (rather poorly). Some things are salvageable (the nine hole clutch cover is one of them thank goodness), other parts are not (like the alternator cover).

It looks like the chain on this bike must have puncture the engine cases at some point. Fortunately, someone did a good job of fixing the cases, so I won’t need to deal with that.

A few bits of good news...

The oil lines appear correct:


Lots of original bolts:


The oil pump screen appears to have done its job (no tears):


Next...the search for a correct frame.
Ujeni Motors
Sandcast #410
Sandcast #538 Watch the restoration!
Sandcast #6592 All original daily driver.
Diecast #16608


Sam

  • Administrator
  • Sr. Member
  • *****
    • Posts: 397
    • View Profile
As I mentioned, the bike came with a much later K0 frame (29xxx). Finding a correct frame (within 300 of the engine number I am told) took almost nine months. After about five months, I found a sand cast frame in Texas #2685. Not technically correct, but it was the first sand cast frame I came across. I bought it thinking it was my only chance. The seller did a great job packing it:


The frame was in great condition, so I set it aside as I searched for more parts.

About four months after that, frame #1387 appeared on ebay. I won it and had a correct frame! Of course, it wasn’t that simple. The passenger peg drops on the frame had been damaged. They were still there, but a portion of the tubing was was crunched; they needed to be replaced. I was able to scavenge the correct tubing from the K0 frame that the engine came with. Tack welded into place:


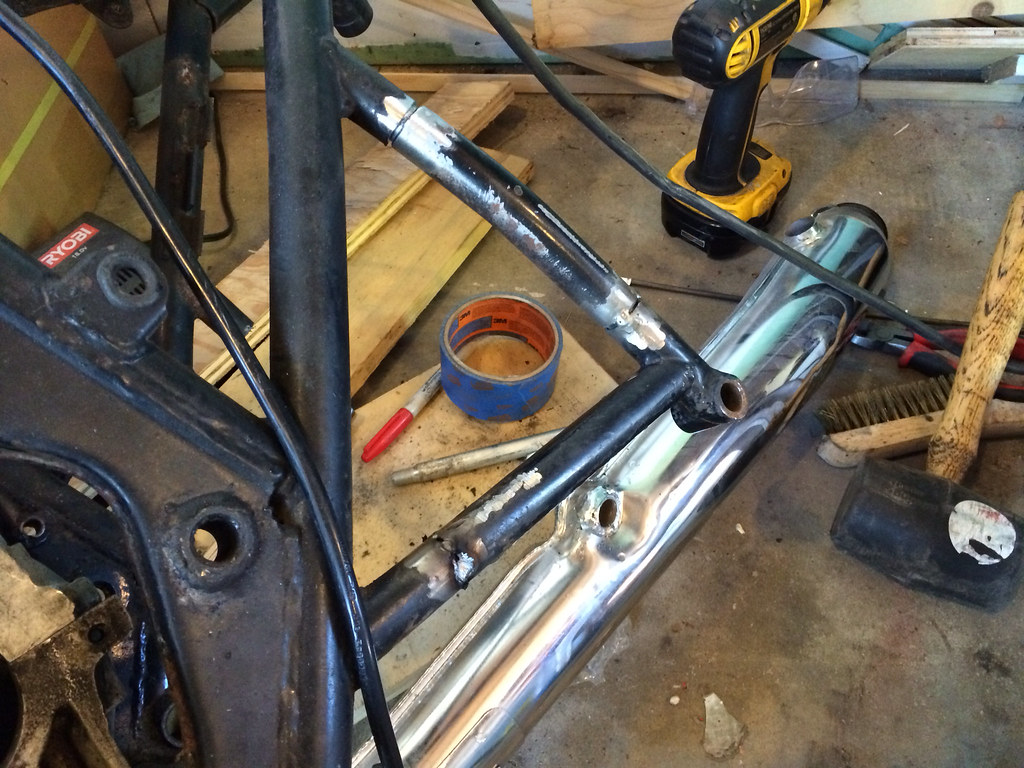
The trick was to make sure that the exhaust lined up perfectly when the engine was mounted (with gaskets installed):


By the way, did you know that the eyelets that connect to the exhausts and passenger foot pegs are welded to the tubing in different ways? Take a look...

Frame #2685 (same on the #1387):


K0 frame (#29xxx):


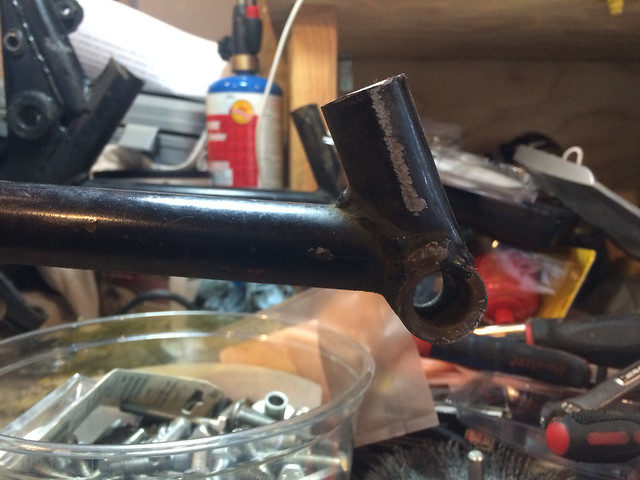
See how the horizontal tubing on the K0 is welded to the eyelet while the sandcast frame horizontal tubing is welded above the eyelet? Who knew?! Well, I didn't  ;D

Anyway, the newly welded frame fits up perfectly. I also did a quick fix on the side stand mount. Now its ready to be blasted and painted. I'll come back to that later.

Next...the engine cases!
Ujeni Motors
Sandcast #410
Sandcast #538 Watch the restoration!
Sandcast #6592 All original daily driver.
Diecast #16608


Sam

  • Administrator
  • Sr. Member
  • *****
    • Posts: 397
    • View Profile
At some point the engine was painted black with very poor quality paint. That combined with decades of caked on oil and grime led to some very nasty cases. Worse, a small bit of the case just above the top left mount point was broken off. You can see it just above cylinder #2 in the this pic:


I had an expert welder friend of mine solve the broken tab problem. He did a great job. I then brought the cases to a mechanic friend who has a high-temp cleaner. I then bead blasted the cases and prepped them for paint:


My top-of-the-line engine paint booth (the idea came from UKPete):


Painting complete (I used Duplicolor High Heat Engine Paint called Aluminum Cast Coat 1650):


Then off to the oven for curing. I cooked them at 225F for about 30 minutes. Came out very nice with excellent adhesion (note the fixed area above the left mount point):


Thats where I am as of today.

Next...building the engine!


Ujeni Motors
Sandcast #410
Sandcast #538 Watch the restoration!
Sandcast #6592 All original daily driver.
Diecast #16608


greggo325

  • Full Member
  • ***
    • Posts: 112
    • View Profile
Nice progress!  Do you still have that other sandcast frame?


Sam

  • Administrator
  • Sr. Member
  • *****
    • Posts: 397
    • View Profile
Hey Greggo!

Yeah, frame #2658 is hanging in my garage. For sale if anyone needs a frame. Its in great shape.
Ujeni Motors
Sandcast #410
Sandcast #538 Watch the restoration!
Sandcast #6592 All original daily driver.
Diecast #16608


kmb69

  • Sr. Member
  • ****
    • Posts: 307
    • View Profile

UK Pete

  • Sr. Member
  • ****
    • Posts: 337
    • View Profile
Hi ujeni looks great what your doing, I was pleased to see the engine spray stand, glad you liked my idea  great news you picked up a frame, given how hard it is to find, keep up the good work fella
Pete


Sam

  • Administrator
  • Sr. Member
  • *****
    • Posts: 397
    • View Profile
Hey Pete!

You need to post more pics so I can copy more of your ideas! Ha!

On the frame, I'll send messages in order of interest expressed and post when it is sold.

I'm on vacation right now, but I'll be assembling the engine when I get home next week! Prepare for questions :)
Ujeni Motors
Sandcast #410
Sandcast #538 Watch the restoration!
Sandcast #6592 All original daily driver.
Diecast #16608


Sam

  • Administrator
  • Sr. Member
  • *****
    • Posts: 397
    • View Profile
Back from a quick vacation and I have a few days lined up for the sandcast.

Last night I coated the insides of the engine cases:


Next....transmission!
Ujeni Motors
Sandcast #410
Sandcast #538 Watch the restoration!
Sandcast #6592 All original daily driver.
Diecast #16608


Sam

  • Administrator
  • Sr. Member
  • *****
    • Posts: 397
    • View Profile
Sam, Did you get my PM? Keith


Yup. Sorry for the delay. I've replied!
Ujeni Motors
Sandcast #410
Sandcast #538 Watch the restoration!
Sandcast #6592 All original daily driver.
Diecast #16608


Sam

  • Administrator
  • Sr. Member
  • *****
    • Posts: 397
    • View Profile
Got a good bit done over the last week. It helps to be home on paternity leave!

I started by replating the original "8" bolts. Original of the left, beed blasted in the middle and zinc plated on the right (needs a bit more polishing in this example):


The bottom end of the engine went together fairly easily. I must admit that it did take some time to figure out which crank shaft bearings to use (thanks for the help out there...you know who you are!):


I then flipped the engine over...


...rebuilt the oil pump (note at the top that someone must have tried to file a bit of the oil pump down at some point...no idea why and it doesn't affect the operation of the pump)...


...and sealed up the bottom end (after priming the pump of course):


Next was the top end....


Hmmm...which is the new one?  ;D


Got the top end assembled:


Next...the clutch!
Ujeni Motors
Sandcast #410
Sandcast #538 Watch the restoration!
Sandcast #6592 All original daily driver.
Diecast #16608


honda mec

  • Newbie
  • *
    • Posts: 33
    • View Profile