Honda CB750 Sandcast

Restoration of Sandcast #97

markb · 814 · 284438

markb

  • Moderator
  • Hero Member
  • *****
    • Posts: 1249
    • View Profile
I decided to use new coils.  I understand that some of the early coils were larger but if #97’s were then my frame probably would have been notched per Honda Recall #15 for the throttle valve and cable.  Of course the coils could have been changed before the recall but when I go to first start up I don’t want to be wondering if the coils are bad if I have issues.  Picture shows no notch.


So I have the coils mounted.  It’s really hard to tell just how they go from looking at the parts manuals; in fact the early and later manuals are different in which way the coil hanger bracket goes.  Take a look at the pictures below and tell me if you think I have it assembled correctly.  It seemed to be the only way it would go so that the coils were centered on the frame.  Here’s the right side.


Here’s the left side.
 
Mark B
1969 CB750 sandcast #97 restored - Sold Restoration thread link
1969 CB750 sandcaxt #576 - Sold
1969 CB750 sandcast #1553 - Sold
1969 CB750 sandcast #1990 - Sold
1969 CB750 sandcast #5383 restored - Sold Restoration thread link
1970 CB750 K0 restored - Sold
2010 H-D Tri Glide Ultra Classic (Huh?)


kp

  • Administrator
  • Hero Member
  • *****
    • Posts: 1801
    • View Profile

Steve Swan

  • Hero Member
  • *****
    • Posts: 2705
    • View Profile
    • cb750sandcastonly.com
honestly, i could be wrong, but i don't think i am, but it's all from memory, so forgive me, but seems one bolt went one way and the other bolt went the other..... ???


DW69K0

  • Sr. Member
  • ****
    • Posts: 332
    • View Profile
And don't forget to align the bolt heads straight up and down for Steve..... ;D
DW


markb

  • Moderator
  • Hero Member
  • *****
    • Posts: 1249
    • View Profile
I found this picture in a Honda Manual.  It’s a little hard to see but the coil appears to be mounted the same way I did it.


And don't forget to align the bolt heads straight up and down for Steve..... ;D
DW

Fortunately the picture doesn't show the heads aligned.  ::)  ;D
Mark B
1969 CB750 sandcast #97 restored - Sold Restoration thread link
1969 CB750 sandcaxt #576 - Sold
1969 CB750 sandcast #1553 - Sold
1969 CB750 sandcast #1990 - Sold
1969 CB750 sandcast #5383 restored - Sold Restoration thread link
1970 CB750 K0 restored - Sold
2010 H-D Tri Glide Ultra Classic (Huh?)


4pots1969

  • Hero Member
  • *****
    • Posts: 759
    • View Profile
Your editing is good, front support goes to the left and the rear bracket goes to the right.
Mark... You have the instinct!!  ::)  ;)
« Last Edit: June 18, 2015, 11:31:52 am by 4pots1969 »


markb

  • Moderator
  • Hero Member
  • *****
    • Posts: 1249
    • View Profile
I have been plugging away but have fallen behind in my posts. 

After much discussion on this thread, http://cb750sandcastonly.com/smf_forum/index.php?topic=281.0,
I have decided to go with Dunlop F11/K87 tires from Yamiya.  They seem to be the tire of choice by Vic World and others.  I would still like to find some decent Bridgestone Super Speeds but I’m not very optimistic about finding a good rear one.


These are the wheels that came on #97.  I tried to take a picture that shows the rolled rim but this is about the best I got.


The DID logo is the only marking on the rims.


This bike won’t get many miles on it and probably won’t ever get these lines worn off.  For showing should I try to wash them off or just leave them?
Mark B
1969 CB750 sandcast #97 restored - Sold Restoration thread link
1969 CB750 sandcaxt #576 - Sold
1969 CB750 sandcast #1553 - Sold
1969 CB750 sandcast #1990 - Sold
1969 CB750 sandcast #5383 restored - Sold Restoration thread link
1970 CB750 K0 restored - Sold
2010 H-D Tri Glide Ultra Classic (Huh?)


markb

  • Moderator
  • Hero Member
  • *****
    • Posts: 1249
    • View Profile
I agree.  So should I let it look like it just left the factory or like it might have been ridden?
« Last Edit: July 29, 2015, 01:33:58 pm by markb »
Mark B
1969 CB750 sandcast #97 restored - Sold Restoration thread link
1969 CB750 sandcaxt #576 - Sold
1969 CB750 sandcast #1553 - Sold
1969 CB750 sandcast #1990 - Sold
1969 CB750 sandcast #5383 restored - Sold Restoration thread link
1970 CB750 K0 restored - Sold
2010 H-D Tri Glide Ultra Classic (Huh?)


markb

  • Moderator
  • Hero Member
  • *****
    • Posts: 1249
    • View Profile
After much research I determined that the carb insulator bands (carb to head) are finished in nickel chrome and the airbox bands are zinc plated.  I found a NOS set of the airbox bands and since the insulator bands are unavailable I had mine replated.  I think they turned out perfect.


Also the carb insulator bands have a square nut with a 22mm screw and the airbox bands have a hex nut with a 20mm screw.  By the way, the colors in this pic are not the way the parts actually look.  I was wearing a maroon shirt that must have reflected.  ::)


These features are on the early sandcasts.  Beyond that I won’t make any claims.
« Last Edit: July 29, 2015, 05:54:29 pm by markb »
Mark B
1969 CB750 sandcast #97 restored - Sold Restoration thread link
1969 CB750 sandcaxt #576 - Sold
1969 CB750 sandcast #1553 - Sold
1969 CB750 sandcast #1990 - Sold
1969 CB750 sandcast #5383 restored - Sold Restoration thread link
1970 CB750 K0 restored - Sold
2010 H-D Tri Glide Ultra Classic (Huh?)


markb

  • Moderator
  • Hero Member
  • *****
    • Posts: 1249
    • View Profile
I had forgotten about my brake caliper until I was working on my wheels.  I paint them the same color as the engine cases.  I already had it apart but I couldn’t get the piston out.  I seem to remember previously using a hose clamp to clamp an airline onto the bleeder screw and plugging the inlet and turning up the pressure until the piston came out.  This go round I decided to make up an adapter tool.  I drilled a hole in a M10 screw and tapped a hole for a #10-32 to ¼” tube fitting. 

Then I put my adapter in the inlet, plugged the bleeder hole (could have just left the bleeder screw in) and hooked it up with a regulator.  I set it in the vice just in case it would blast the piston out.  I turned the regulator up to 100 psi and was disappointed at first because I didn’t think it did anything but when I took the caliper out of the vice the piston was half way out.  The vice was preventing it from coming all the way out.  So I opened the vice up a bit and turn the pressure up again and it came right out. 

Mark B
1969 CB750 sandcast #97 restored - Sold Restoration thread link
1969 CB750 sandcaxt #576 - Sold
1969 CB750 sandcast #1553 - Sold
1969 CB750 sandcast #1990 - Sold
1969 CB750 sandcast #5383 restored - Sold Restoration thread link
1970 CB750 K0 restored - Sold
2010 H-D Tri Glide Ultra Classic (Huh?)


steff750

  • Full Member
  • ***
    • Posts: 101
  • THE POWER OF DREAMS
    • View Profile


Quote
This bike won’t get many miles on it and probably won’t ever get these lines worn off.  For showing should I try to wash them off or just leave
;) i would say run them tires in for a hundred miles just too scrub them in ,that should remove the lines at the same time
i would not like to see that nice new bike go down the road, just cause the tires are to smooth ;) safe driving
« Last Edit: August 02, 2015, 02:05:23 pm by steff750 »


markb

  • Moderator
  • Hero Member
  • *****
    • Posts: 1249
    • View Profile
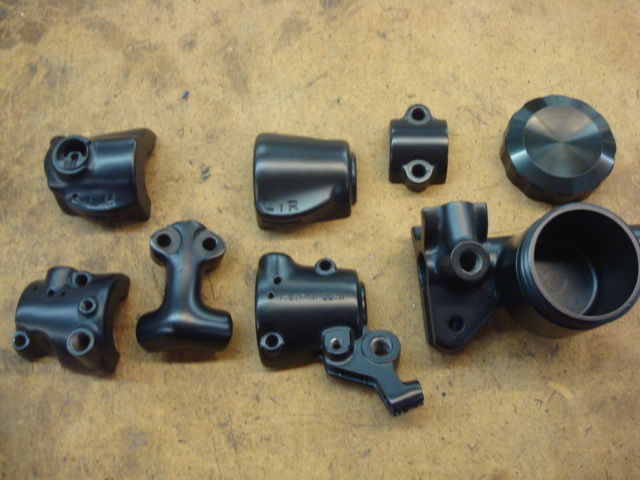
My anodizing is finally done.  It took me 3 times to get it right but they look great.  ;D I had close to 4 sets that I had done twice.  >:( First lesson: do a small batch and see how they turn out.  I brought them to a local plater along with a NOS part for an example.  No problem.  They would strip and anodize them.  When I went to pick them up they were black but as flat as they could be.  “If I wanted them shiner I should have asked to have them polished.”  “But I showed you a part that was how I wanted it!”  Didn’t matter.  OK so I left them again for stripping, polishing and anodizing.  When I picked them up they were a bit shinier but blotchy.  “There’s nothing I can do about these old cast parts.”  So I saw a post from Ujeni (Sam) showing some parts he had done.  It turns out there are two processes for anodizing: sulfuric and chromic.  Chromic is the required process.  My plater does sulfuric and I could not find anyone in my area that does chromic.  So I had them stripped, again, from my same local plater and polished them.  Sam offered to check them out and get them to his plater.  Sam’s plater is Sanford Metal Processing in CA.  Thanks again Sam.  ;) Again they look great.  So if you want to anodize your control housings and master cylinder here’s what you have to do.
1.   Have them stripped.
2.   Polish them (I don’t think you can overdo this step).
3.   Have them anodized using the chromic method.
I hope yours turn out as well as mine did.

Mark B
1969 CB750 sandcast #97 restored - Sold Restoration thread link
1969 CB750 sandcaxt #576 - Sold
1969 CB750 sandcast #1553 - Sold
1969 CB750 sandcast #1990 - Sold
1969 CB750 sandcast #5383 restored - Sold Restoration thread link
1970 CB750 K0 restored - Sold
2010 H-D Tri Glide Ultra Classic (Huh?)


Sam

  • Administrator
  • Sr. Member
  • *****
    • Posts: 397
    • View Profile
Happy to help out Mark! Parts look great!
Ujeni Motors
Sandcast #410
Sandcast #538 Watch the restoration!
Sandcast #6592 All original daily driver.
Diecast #16608