Honda CB750 Sandcast

Restoration of Sandcast #97

markb · 814 · 285372

kp

  • Administrator
  • Hero Member
  • *****
    • Posts: 1801
    • View Profile
For our good friend Riccardo, I will do this with pleasure. I will however, have to post in another area of the forum. KP
Yabba Dabba KP


Riccardo

  • Sr. Member
  • ****
    • Posts: 362
    • View Profile
Many thanks KP, dear friend.
Riccardo
Your Italian friend.
737/940 Restored
1081/1362 Preserved
1256/665 Restored - ex Owner: Chris R.
10253/10315 (K0) Next project
1969 - Kawasaki H1 Mach III low ign cover - Restored
1969 - Kawasaki H1 Mach III high ign cover - Restored
1971 - Kawasaki H1A - Restored
1973 - Kawasaki H1D - Preserved
1973 - Kawasaki Z1 Blackhead - Restored
1971 - Norton Commando SS - Preserved
1978 - Honda CBX - Unmolested Museum Quality
1988 - Honda CB 400SS - Unmolested
1997 - BMW R80 GS Basic - blue frame - Museum Quality
2007 - BMW HP2 Megamoto - blue frame - New


markb

  • Moderator
  • Hero Member
  • *****
    • Posts: 1249
    • View Profile
kp,
Thanks for sharing your knowledge on these early carbs.  I'll look forward to seeing your additional comments.
Mark
Mark B
1969 CB750 sandcast #97 restored - Sold Restoration thread link
1969 CB750 sandcaxt #576 - Sold
1969 CB750 sandcast #1553 - Sold
1969 CB750 sandcast #1990 - Sold
1969 CB750 sandcast #5383 restored - Sold Restoration thread link
1970 CB750 K0 restored - Sold
2010 H-D Tri Glide Ultra Classic (Huh?)


markb

  • Moderator
  • Hero Member
  • *****
    • Posts: 1249
    • View Profile
I picked up the painting this past week.  Everything looks pretty good but it seems glossier than I remember.  The painter swears it’s the same as my other bikes so I guess I’m good with it. 


I guess my only complaint is the paint looks like it got a little heavy on the VIN.  It’s really hard to get a good shot when the paint is so new and it’s more readable than it is in the pic.  I’m not real pleased about it but I think I’ll let it go.


I didn’t do the top fork bridge yet because I think the paint is less glossy than the rest and didn’t want to do it in this batch.  But I can’t remember if the lower part of the fork stem is glossy like the frame or more matte like the top fork bridge and my other bikes are in storage so I can’t look to compare.  Anyone know?
Mark B
1969 CB750 sandcast #97 restored - Sold Restoration thread link
1969 CB750 sandcaxt #576 - Sold
1969 CB750 sandcast #1553 - Sold
1969 CB750 sandcast #1990 - Sold
1969 CB750 sandcast #5383 restored - Sold Restoration thread link
1970 CB750 K0 restored - Sold
2010 H-D Tri Glide Ultra Classic (Huh?)


kp

  • Administrator
  • Hero Member
  • *****
    • Posts: 1801
    • View Profile
Mark
I have a few lower trees and the K0 look to be a semi-gloss and the later are gloss. It's hard to tell if they were originally gloss and dulled down. I've gone with semi on mine but others may have a better idea
I was told by Andy Morris some years ago to use a sharp scribe to cut into the VIN. I've never done it though. Anyone else got any ideas about this KP
Yabba Dabba KP


markb

  • Moderator
  • Hero Member
  • *****
    • Posts: 1249
    • View Profile
KP,
I assume you did semi on the top fork too? 
I saw a post by Andy about that somewhere and I do it before the painter gets it to make sure there's no rust that the blasting might not get out.  It's really better than it looks in the pic and there really wasn't much else to complain about.  I'm think I'm just being anal (again).
Mark
Mark B
1969 CB750 sandcast #97 restored - Sold Restoration thread link
1969 CB750 sandcaxt #576 - Sold
1969 CB750 sandcast #1553 - Sold
1969 CB750 sandcast #1990 - Sold
1969 CB750 sandcast #5383 restored - Sold Restoration thread link
1970 CB750 K0 restored - Sold
2010 H-D Tri Glide Ultra Classic (Huh?)


markb

  • Moderator
  • Hero Member
  • *****
    • Posts: 1249
    • View Profile
I had a minor setback with the oil tank but I got it taken care of.  They’re a PITA to get painted.

I had cleaned it out and de-rusted it with the Safest Rust Remover before painting.  It looked pretty good.  I was tempted to put oil in it to coat the insides but I was afraid that if any leaked out when painting that it would be a problem and if any blasting media got in it would stick to the oil.  I just use the standard plug for the drain hole and plug three of the other holes with rubber stoppers and tape to make sure they stay in place.


For the smaller breather tube I use a ¼” nylon screw (lower right, it was white before it got painted).


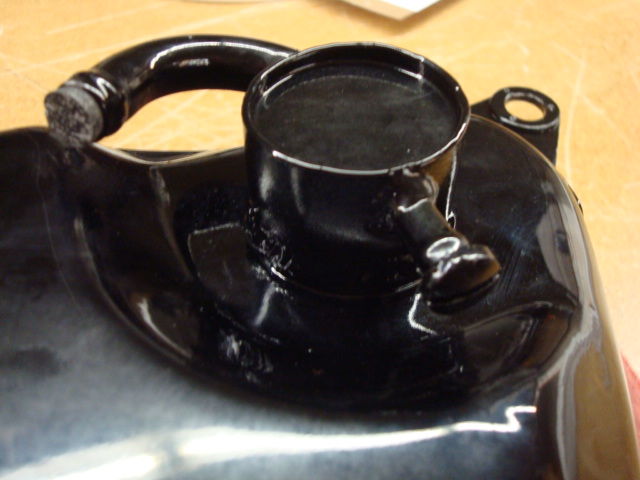
For the main fill (this is a tough one to mask) I machined a press fit plastic plug and used a soft o-ring to seal it up.


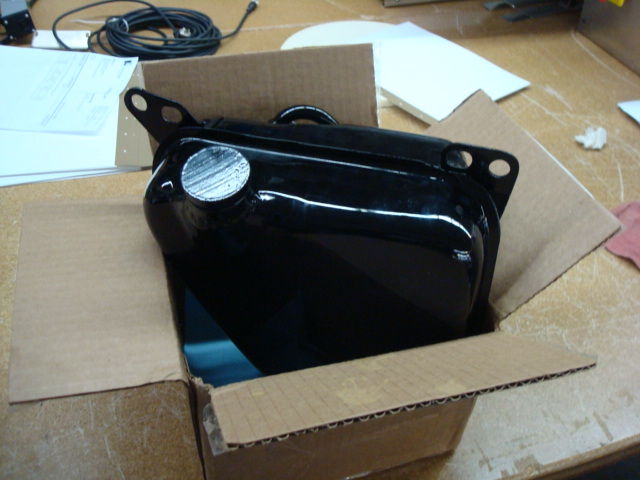
Well, the problem was, when I got it back the inside had some rust in it again.  It’s been about three weeks or so.  I suppose going in and out of the cold caused some moisture to condense inside.  Not real bad but I just couldn’t leave it in there.  So I plugged it up again and filled it with the Safest Rust Remover and let it sit over night.  I put it in a box so it would sit upright.


This morning I dumped it out and it looked real good.  I flushed it out with tons of hot water and used compressed air and then a hair dryer to dry it out good.  Then I poured ½ quart of oil in it and rolled it around so everything inside is now covered with oil.  It was a lot of extra farting around.  I’m gonna half to think this through better next time around.
Mark B
1969 CB750 sandcast #97 restored - Sold Restoration thread link
1969 CB750 sandcaxt #576 - Sold
1969 CB750 sandcast #1553 - Sold
1969 CB750 sandcast #1990 - Sold
1969 CB750 sandcast #5383 restored - Sold Restoration thread link
1970 CB750 K0 restored - Sold
2010 H-D Tri Glide Ultra Classic (Huh?)


markb

  • Moderator
  • Hero Member
  • *****
    • Posts: 1249
    • View Profile
Crankshaft update:
I heard from APE last week.  They recommended repairing the rotor end main journal and also one rod journal that was marginal.  I decided to do what they recommended.  That will take about 8 weeks but I will feel much better about using it.
Mark B
1969 CB750 sandcast #97 restored - Sold Restoration thread link
1969 CB750 sandcaxt #576 - Sold
1969 CB750 sandcast #1553 - Sold
1969 CB750 sandcast #1990 - Sold
1969 CB750 sandcast #5383 restored - Sold Restoration thread link
1970 CB750 K0 restored - Sold
2010 H-D Tri Glide Ultra Classic (Huh?)


Wayne

  • Administrator
  • Hero Member
  • *****
    • Posts: 1044
    • View Profile
As do I. Glad you took that extra step Mark.
[size=


kp

  • Administrator
  • Hero Member
  • *****
    • Posts: 1801
    • View Profile
KP,
I assume you did semi on the top fork too? 
I saw a post by Andy about that somewhere and I do it before the painter gets it to make sure there's no rust that the blasting might not get out.  It's really better than it looks in the pic and there really wasn't much else to complain about.  I'm think I'm just being anal (again).
Mark

Yes Mark, My top trees are painted in a semi gloss/satin.
In regards your tank, I now neutralize the metal after I derust my tanks as the ph is altered after treatment and you get an acid ph. I use sodium bi carbonate (1 cup) to a tank of water to rinse out all the acid, rinse with vinegar (same strength) then a final rinse with a lye soap. Coat the tank with de moisturizing product. We have WD40, RP7 and CRC. There are probably other products available to you in the machining industry I've always had surface rust problems after cleaning tanks and the like. Since I follow this process which was given to me by my welder/fitter I've not had an issue. KP   

It's a simple process
Yabba Dabba KP


markb

  • Moderator
  • Hero Member
  • *****
    • Posts: 1249
    • View Profile
I’m still trying to figure out my options for repairing the alternator cover so I decided to take a look at the air box.  The top half and middle were stuck together.  I’ve been warned they were glued at the factory, but I felt that they should come apart to properly paint them and repair a crack at the carb rubber holes.  I had tried soaking them in hot water a couple of times with no luck and I was afraid to use anything stronger.  It was loose on one side so it seemed like it could come apart.  I was successful using a razor knife (box cutter) without causing any additional damage.


Looking at the loose side, it appeared that it had only been stuck at the mating surfaces where the knife could be inserted (as seen in pic).  So I slowly and gently and carefully inserted the tip of the knife and worked my way around.  I didn’t do any slicing motion.  Then I stuck my hand through the center piece and slowly and gently and carefully pushed on it.  It took a few more pokes in a couple of areas and Bob’s your uncle.  (I can’t believe I just said that.  I learned it from someone here.)


I would like to maintain the parting lines and ejection pin marks to keep it identifiable as correct so sanding to remove the paint is not an option.  The bottom half was warped (you might be able to see it in the close one below) and I found another in great shape so I’m going to use the warped one to experiment with soda blasting.  I saw a post on the SOHC4 site where it was tried and it looks like it worked great.  Supposedly it only removes the paint without harming the material.

Mark B
1969 CB750 sandcast #97 restored - Sold Restoration thread link
1969 CB750 sandcaxt #576 - Sold
1969 CB750 sandcast #1553 - Sold
1969 CB750 sandcast #1990 - Sold
1969 CB750 sandcast #5383 restored - Sold Restoration thread link
1970 CB750 K0 restored - Sold
2010 H-D Tri Glide Ultra Classic (Huh?)


Wayne

  • Administrator
  • Hero Member
  • *****
    • Posts: 1044
    • View Profile
I wish mine was in that shape Mark! Soda Blasting will strip it fine. Make sure to wash it thoroughly with 50/50 vinegar and water once stripped and your paint should bond forever. Sure I can't have that center piece?  ;)
[size=


kp

  • Administrator
  • Hero Member
  • *****
    • Posts: 1801
    • View Profile
and Bob’s your uncle.  (I can’t believe I just said that.  I learned it from someone here.)

 :-[ Yeah, one of my regularly used phrases. Sometimes I say your uncle Bobby really is your uncle Bobby  ;D

I use it but you made me look up the origin. Commonly used here in Oz KP

http://en.wikipedia.org/wiki/Bob%27s_your_uncle
Yabba Dabba KP


markb

  • Moderator
  • Hero Member
  • *****
    • Posts: 1249
    • View Profile
I talked with APE today.  Bad news.  Their opinion now is that the crank isn’t worth repairing and they wouldn’t put their name on it.  After further inspection they have told me that at least 5 of the journals are undersize.  I’m not sure if that puts the clearance out of the 0.0008-0.0018” (0.020-0.046mm) standard clearance range or beyond the 0.0032” (0.080mm) maximum clearance.  When I measured them I thought they were OK.  But I never checked the calibration of the mic or maybe I got bad readings or who knows what.  In any case, APE has a good reputation and a high standard and if they don’t feel they can bring it up to their standards then so be it.  So I’m back to not knowing what to do.  I’ve got a good sandcast crank with a 12mm rotor bolt but I’d really like to keep the 10mm rotor bolt.  I obviously won't do anything until I get it back.  I guess sometimes Bob's not your uncle.  :(
Mark B
1969 CB750 sandcast #97 restored - Sold Restoration thread link
1969 CB750 sandcaxt #576 - Sold
1969 CB750 sandcast #1553 - Sold
1969 CB750 sandcast #1990 - Sold
1969 CB750 sandcast #5383 restored - Sold Restoration thread link
1970 CB750 K0 restored - Sold
2010 H-D Tri Glide Ultra Classic (Huh?)


Wayne

  • Administrator
  • Hero Member
  • *****
    • Posts: 1044
    • View Profile
Mark, that is bad news. Better that you had it checked though. If you really want to salvage that crank perhaps a company like Gleason can fix it up. I thought APE would have offered services like this.

http://www.gleasonengineering.com/process.php
[size=