Honda CB750 Sandcast

Restoration of Sandcast #97

markb · 814 · 287997

Steve Swan

  • Hero Member
  • *****
    • Posts: 2705
    • View Profile
    • cb750sandcastonly.com
Yes, that 60 (+-) pound figure called for in the Honda manual is for 12 mm dry and is a value for grade 8 bolt.  I would think the 10 mm rotor bolt should be tightened to around 33-36 ft.lbs.  (Below grade 8, the 15-22 ft.lb range.)  (That shaft is not soft like a grade 5, so around 30 ft.lb.)

Hardened 10 mm engine bolts at the shop i work at, we tighten to 40-45 nm which is same as 33-36 ft.lb.  Chassis bolts (rarely use a torque wrench on chassis fasteners) is around 20 ft.lb.


markb

  • Moderator
  • Hero Member
  • *****
    • Posts: 1249
    • View Profile
Steve, Thanks for the thorough answer.  That goes right along with other info I learned.  That is that the CB550 rotor bolt is a 10mm and the manual specifies 28.9-30.3 ft. lbs.  On one hand I think since it's already tightened why worry about it but on the other I'm concerned that the bolt is overstressed and could crack if there is a shock load.  I'll feel better about backing it off.
Mark B
1969 CB750 sandcast #97 restored - Sold Restoration thread link
1969 CB750 sandcaxt #576 - Sold
1969 CB750 sandcast #1553 - Sold
1969 CB750 sandcast #1990 - Sold
1969 CB750 sandcast #5383 restored - Sold Restoration thread link
1970 CB750 K0 restored - Sold
2010 H-D Tri Glide Ultra Classic (Huh?)


Steve Swan

  • Hero Member
  • *****
    • Posts: 2705
    • View Profile
    • cb750sandcastonly.com
yeah, i think i'd take it back where it needs to be.  leaving that torque setting would keep me nutty.  i understand not wanting to loosen it... should  be fine.  if not, much better than snapping in operation or having it eat at you ad nauseum, ad infinitum for not loosening it.


markb

  • Moderator
  • Hero Member
  • *****
    • Posts: 1249
    • View Profile
I loosened and retorqued the rotor bolt to 30 ft. lbs.  I put on some Loctite thread locker just to be safe.  I feel better now.  While I was at it I thought it would be interesting to document some of the distinctions between the early and later sandcasts.  Since 97/E100 is so early it has most if not all of them.  Here is the early and later rotor bolt.  The early one is on the right.  It is an M10 x 1.25 x 45mm long with a plain 17mm hex head.  The later one is larger and has a finer thread.  It is an M12 x 1.0 x 53mm long with a 19mm plain hex head and is necked down near the head and has a thread locking patch on it.  Of course the cranks are threaded accordingly.  The 10mm rotor bolt is used on engines up to 1080.

« Last Edit: December 15, 2013, 05:00:43 pm by markb »
Mark B
1969 CB750 sandcast #97 restored - Sold Restoration thread link
1969 CB750 sandcaxt #576 - Sold
1969 CB750 sandcast #1553 - Sold
1969 CB750 sandcast #1990 - Sold
1969 CB750 sandcast #5383 restored - Sold Restoration thread link
1970 CB750 K0 restored - Sold
2010 H-D Tri Glide Ultra Classic (Huh?)


markb

  • Moderator
  • Hero Member
  • *****
    • Posts: 1249
    • View Profile
Now that the crank is in, on to the transmission.  The originals are in rough shape.  I’m not going to be able to keep everything original anyway so I going to use parts from a donor engine.


Same with the clutch.


My replacements look really good but since I don’t know the history of them I’m going to replace all the bearings including the needle bearings in the primary drive.  I got all the ball bearings from Yamiya for $100 including the shipping.  I couldn’t come close to that from the local bearing supply stores.  I bought the needle bearings separately for $12 apiece.

Mark B
1969 CB750 sandcast #97 restored - Sold Restoration thread link
1969 CB750 sandcaxt #576 - Sold
1969 CB750 sandcast #1553 - Sold
1969 CB750 sandcast #1990 - Sold
1969 CB750 sandcast #5383 restored - Sold Restoration thread link
1970 CB750 K0 restored - Sold
2010 H-D Tri Glide Ultra Classic (Huh?)


markb

  • Moderator
  • Hero Member
  • *****
    • Posts: 1249
    • View Profile
Here is a distinction on the clutch.  The later engines have a one piece clutch center as shown on the left.  The early ones have a separate clutch plate that is held onto the center with a wire retainer.  The three pieces are shown on the right.  The early version went up to engine 1759.


Here’s a close up of the clutch centers showing the groove and the hole for the retainer on the early one.  I know why they changed the design.  The retainer is a PITA to install.  They are a discontinued part but I managed to find a couple so I bought them.  Good thing I did because I already broke one.  Before I break another does anyone have any advice for installing them?

« Last Edit: December 15, 2013, 04:54:39 pm by markb »
Mark B
1969 CB750 sandcast #97 restored - Sold Restoration thread link
1969 CB750 sandcaxt #576 - Sold
1969 CB750 sandcast #1553 - Sold
1969 CB750 sandcast #1990 - Sold
1969 CB750 sandcast #5383 restored - Sold Restoration thread link
1970 CB750 K0 restored - Sold
2010 H-D Tri Glide Ultra Classic (Huh?)


markb

  • Moderator
  • Hero Member
  • *****
    • Posts: 1249
    • View Profile
I got it!  I tried another retainer and it went right in.  I compared it to the one that broke and it appears that the other one was too short.  Maybe from another similar Honda clutch?  The ends wouldn’t go all the way through the hole like in the picture.  By the way, that is a new clutch plate.  I also bought the other six plates, new friction discs, springs and lock washer.

Mark B
1969 CB750 sandcast #97 restored - Sold Restoration thread link
1969 CB750 sandcaxt #576 - Sold
1969 CB750 sandcast #1553 - Sold
1969 CB750 sandcast #1990 - Sold
1969 CB750 sandcast #5383 restored - Sold Restoration thread link
1970 CB750 K0 restored - Sold
2010 H-D Tri Glide Ultra Classic (Huh?)


markb

  • Moderator
  • Hero Member
  • *****
    • Posts: 1249
    • View Profile
I finally had a significant amount of time to do some work over the weekend.  I was hoping to make some real progress for a change.  Not to be (as you will soon see).

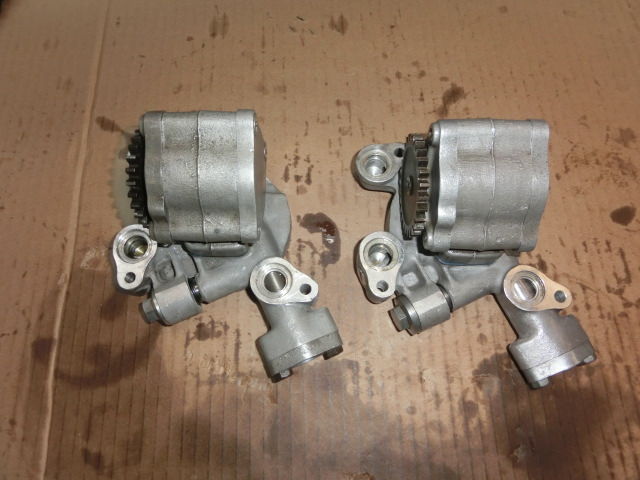
I first decided to wrap up the oil pump.  I had the three sandcast bodies and bases hot tanked and ultrasonically cleaned.  There was a lot of thick sludge in the passageways and I wanted to make sure they were clean.  The early one still looks pretty rough but I decided to reassemble the other two.  The check valve holes were varnished up so I ran a 12mm reamer into them to clean them out and then polished them up a bit.  Then I picked the best sets of rotors and other parts from six pumps and measured everything (bores, OD’s, thicknesses, depths, feeler gauge clearances) to make sure all was in spec.  I used the cream of the crop for the pump I’m putting in E100.  Also new seals, springs and oil stopper valves for both. 


I liberally oiled everything and put them together.  The one slated for E100 went together perfect and feels great.  Then the second pump not so much.  I could feel a little catch at certain points when I rotated the gear.  Took it apart several times and re-inspected everything and even changed pins, rotor sets, etc.  I finally gave up for now and put a tag on it so I won’t forget and will get back to it later.  I probably should have just moved on right away since the second pump isn’t helping with this project but I’m trying to come up with a way to test them and it would be nice to do both.  Instead I ended up wasting the better part of the afternoon.  :(


So I decided to finish up with the main shaft and clutch.  Everything went well until I got to the clutch.  Somehow I ended up with the wrong (incorrect, they would still work but correct for later clutches) friction plates and clutch springs (too long).  I still haven’t figured out if I ordered the wrong ones or just got the wrong ones.  Sometimes it’s frustrating not being able to just finish something.  :'(
Mark B
1969 CB750 sandcast #97 restored - Sold Restoration thread link
1969 CB750 sandcaxt #576 - Sold
1969 CB750 sandcast #1553 - Sold
1969 CB750 sandcast #1990 - Sold
1969 CB750 sandcast #5383 restored - Sold Restoration thread link
1970 CB750 K0 restored - Sold
2010 H-D Tri Glide Ultra Classic (Huh?)


markb

  • Moderator
  • Hero Member
  • *****
    • Posts: 1249
    • View Profile
Ok it’s Sunday now and I figure I’ll tackle something easy.  I’ve got a couple of nice final shafts and gears (the original shaft, gear and bearings are one solid rusted piece) so I pull one out and put on new bearings.  I notice that someone has plugged the oil hole to disable the automatic oiler and decided to leave it that way for now.  I set it in place in the upper case and gave it a spin expecting it to be nice and smooth.  That would have been too easy.  The gear was definitely rubbing.  :o I pulled that shaft out to take a look.  Here’s a pic of the case.  You can see where someone (at the factory?) had done some grinding.  If you look to the right of that you can see a radial line where it appears the old gear was rubbing.


I kept looking at the manual and my other shafts just to make sure I put it together right.  There’s only two ways to put the gear on (it has a wider shoulder on one side than the other) and the other would make it worse.  I even tried one of my other shafts and gears hoping that would fix it.  Nope.  My head was getting sore from scratching it.  To be sure where it was rubbing I marked it up with a red sharpie and you can definitely see it.  So I got out the Dremel and took the crank and main shaft out and covered the mains (so I wouldn’t get grinding dust on them) and went at it.  I didn’t have the greatest tips and they kept loading up so it took forever.  I lost count of how many times I took the shaft in and out.  Every time I’d grind and remark it I would find another high spot. ??? Finally it quit rubbing and I ground all over one more time for good measure and even then it really wasn’t much that I ground off.  So that’s a couple more hours I’ll never get back.  I hate to say it but after that I just didn’t feel like doing any more today.  I guess that’s what happens when you work with sand castings. ;D I hope there’s more clearance on the other half.  ::)

Mark B
1969 CB750 sandcast #97 restored - Sold Restoration thread link
1969 CB750 sandcaxt #576 - Sold
1969 CB750 sandcast #1553 - Sold
1969 CB750 sandcast #1990 - Sold
1969 CB750 sandcast #5383 restored - Sold Restoration thread link
1970 CB750 K0 restored - Sold
2010 H-D Tri Glide Ultra Classic (Huh?)


markb

  • Moderator
  • Hero Member
  • *****
    • Posts: 1249
    • View Profile
I’ve been thinking about the interference on the final shaft gear so I checked out the upper case from E1490 and I’m guessing this wasn’t a rare problem.  This case obviously had to be machined to provide enough clearance.

Mark B
1969 CB750 sandcast #97 restored - Sold Restoration thread link
1969 CB750 sandcaxt #576 - Sold
1969 CB750 sandcast #1553 - Sold
1969 CB750 sandcast #1990 - Sold
1969 CB750 sandcast #5383 restored - Sold Restoration thread link
1970 CB750 K0 restored - Sold
2010 H-D Tri Glide Ultra Classic (Huh?)


markb

  • Moderator
  • Hero Member
  • *****
    • Posts: 1249
    • View Profile
Here’s another interesting distinction.  The oil plug just above the oil filter housing and on the upper case is different.  On the left is the early one that is used up to E219.  The head measures approximately 16.5mm and it uses a packing with a square cross section.  The one on the right is on engines E220 and up and measures approximately 18.5mm and uses an o-ring.


While comparing the cases I took pictures of another distinction.  The early upper cases have cast bosses with untapped 6mm holes in the primary chain tunnel area.  It appears it could have been intended for mounting a tensioner or guide for the primary chain.  


Here’s a pic of a later case (E1490) without the holes.  It’s been observed that this changed occurred somewhere around number 200.  Besides the plug change noted above there were other changes to the cases at 220.  I would guess the holes probably disappeared then too.

« Last Edit: December 28, 2013, 03:41:43 pm by markb »
Mark B
1969 CB750 sandcast #97 restored - Sold Restoration thread link
1969 CB750 sandcaxt #576 - Sold
1969 CB750 sandcast #1553 - Sold
1969 CB750 sandcast #1990 - Sold
1969 CB750 sandcast #5383 restored - Sold Restoration thread link
1970 CB750 K0 restored - Sold
2010 H-D Tri Glide Ultra Classic (Huh?)


kp

  • Administrator
  • Hero Member
  • *****
    • Posts: 1801
    • View Profile
Just a thought Mark but I'm not sure the engine number is a good guide. I'm assuming of course that the cases were numbered randomly and probably after engine building thus what might hold for engine X may not hold for engine Y. Nevertheless the fact there are these variations being identified occurred is amazing historic information. Ill measure the plug on 342 when I return from holidays. Is the plug easy enough to measure without removal from the engine as I don't want to remove it if I can help it. kP
Yabba Dabba KP


markb

  • Moderator
  • Hero Member
  • *****
    • Posts: 1249
    • View Profile
KP, you have a good point.  The K0 parts manual shows a change to the plug at 220 but depending on how and when the cases were numbered it certainly seems possilbe that the small plug could be found on engines after 219.  We'll probably never know for sure.  

It might be a little difficult to get at but you should at least be able to measure yours close enough to see if it's the small or the larger plug.
« Last Edit: December 29, 2013, 02:48:19 pm by markb »
Mark B
1969 CB750 sandcast #97 restored - Sold Restoration thread link
1969 CB750 sandcaxt #576 - Sold
1969 CB750 sandcast #1553 - Sold
1969 CB750 sandcast #1990 - Sold
1969 CB750 sandcast #5383 restored - Sold Restoration thread link
1970 CB750 K0 restored - Sold
2010 H-D Tri Glide Ultra Classic (Huh?)


kmb69

  • Sr. Member
  • ****
    • Posts: 307
    • View Profile
Here’s another interesting distinction.  The oil plug just above the oil filter housing and on the upper case is different.  On the left is the early one that is used up to E219.  The head measures approximately 16.5mm and it uses a packing with a square cross section.  The one on the right is on engines E220 and up and measures approximately 18.5mm and uses an o-ring.


While comparing the cases I took pictures of another distinction.  The early upper cases have cast bosses with untapped 6mm holes in the primary chain tunnel area.  It appears it could have been intended for mounting a tensioner or guide for the primary chain.  


Here’s a pic of a later case (E1490) without the holes.  It’s been observed that this changed occurred somewhere around number 200.  Besides the plug change noted above there were other changes to the cases at 220.  I would guess the holes probably disappeared then too.


Great pictures, Mark. Especially for proving these cases were cast in sand molds. Look closely at these case pictures and you will see many variations, bosses, "funny" marks, web thickness, etc. Check out the extra material around the right, lower (in the picture) primary bearing boss. I don't believe you would see these variations from permanent molds. They would have had to be re-machining them between pours or had multiple DIFFERENT permanent molds producing those variations.


markb

  • Moderator
  • Hero Member
  • *****
    • Posts: 1249
    • View Profile
I got my clutch friction disks and springs so I could finish main shaft.  I took both transmission shafts apart to inspect them and make sure they were assembled correctly and there are a lot of small holes that I wanted to make sure weren’t plugged.


Here’s another distinction on the clutch.  According to the parts manuals, up to engine 1759, the six inner friction disks had longer tabs than the one in the outer clutch ring.  I think they were the same disks used on the 450’s.  After 1759 there are a total of seven of the shorter tabbed disks.  There’s no reason that I could see that they couldn’t have used seven of the shorter tabbed disks on earlier engines.


I’ve got everything in the cases except for the kick starter and I’ll be ready to put the cases together.


Here is the way I aligned my primary chains.  This is how I have always done it but I have heard that some people prefer to jump a tooth on one strand to offset the links on the primary chains.


« Last Edit: December 22, 2014, 07:37:47 pm by markb »
Mark B
1969 CB750 sandcast #97 restored - Sold Restoration thread link
1969 CB750 sandcaxt #576 - Sold
1969 CB750 sandcast #1553 - Sold
1969 CB750 sandcast #1990 - Sold
1969 CB750 sandcast #5383 restored - Sold Restoration thread link
1970 CB750 K0 restored - Sold
2010 H-D Tri Glide Ultra Classic (Huh?)